Tuesday, December 9, 2014

Scheduler - Schedule in Working Periods only

Goal: 
Use the Maximo Scheduler to schedule workorders in the working periods only. 

Environment:
Windows Server 2012, Oracle 11g, Maximo 7.5.0.6, Scheduler 7.5.2

Problem:
When using the Maximo Scheduler the schedule isn't according to the working periods. If e.g. the working period is 12 hours a day and the workorder has a duration of 13 hours the work should be scheduled over a 2 day span.
By default the Maximo Scheduler will not show this behavior. Even when we assign the right calendar and shifts the schedule will not use the working periods defined in the calendar shifts.

Example:


Solution:

To tell Scheduler to plan while taking the working period in account we actually need to modify the workorder. On the workorder there is a field INTERRUPTIBLE that by default is set to 0.
When we set this field to 1 the scheduler is allowed to interrupt the work and span it across two days:


The same plan, but now with the interruptible fied checked on all workorders.


When you want this behaviour by default you can set the ITERRUPTIBLE field to 1 by default. Make sure to do this on the WORKORDER object and on the WOACTIVITY object.


Source:

Tuesday, November 18, 2014

Maximo Scheduler 7.5.2 Gantt View Java Settings

Problem:
The Gantt View tab isn't showing in Maximo Scheduler 7.5.2

I use a Maximo 7.5.0.6 environment with Maximo Scheduler 7.5.2 on a Oracle 11G database on Windows Server 2012.


Solution:

First I install Java version 7 update 25  (build 1.7.0_25-b17)

Then when opening the "Gantt View" in Maximo Scheduler 7.5.2 the following messages appear.

In the first message I choose "Later" and check "Do not ask again until next update is available" 


Then I choose [Don't Block]


Then I Check "I Accept the risk and want to run this application"
and Click [Run]


Then on the message about the wrong Java version I click [Run with the latest version]


The errors bewlow appear: 

An exception occured in the script. Error name: TypeError.Error description: Object doesn't support property or method 'initProjectDataModel'. Error number: -2146827850. Error message: Object doesn't support property or method 'initProjectDataModel'


After clicking [OK] the next error occurs:

An exception occured in the script. Error name: TypeError.Error description: Object doesn't support property or method 'setSKDServletURLBase'. Error number: -2146827850. Error message: Object doesn't support property or method 'setSKDServletURLBase'


Then after clicking [OK] the following appears:

An exception occured in the script. Error name: TypeError.Error description: Object doesn't support property or method 'setUISessionId'. Error number: -2146827850. Error message: Object doesn't support property or method 'setUISessionId'


Now when I click [OK] the Gantt shows, but grayed out.

To solve this go to C:\Program Files (x86)\Java\jre7\lib\security and open the file java.policy
In this file add the following lines:
permission java.util.PropertyPermission "user.timezone", "read";
permission java.util.PropertyPermission "user.timezone", "write"; 


Next, open up the Java Control Panel and go to the tab Security. Alter the Security Level to "Medium" 


Apply and close. Go back to the Maximo startcenter and open the Gantt View.

This time the screen is stuck, the load icon isn't moving... 


I also tried Chrome as browser, but in there it also isn't showing anything.

Reason for this is that I disn't create a schedule first.
After creating a Schedule with a query to load up some workorders I do get the Gantt to show up: 


GNZ.

Wednesday, November 12, 2014

Maximo doesn't start, SystemOut.log ORA-28001

Problem:
Maximo doesn't start. The internet browser gives a HTTP 500 Internal Server Error


I use a Maximo 7.5.0.6 environment with a Oracle 11G database on Windows Server 2012.


Solution:

First check the SystemOut.log for the cause. Usually located in  \ibm\WebSphere\AppServer\profiles\ctgAppSrv01\logs\MXServer


[11/12/14 9:03:53:171 CET] 00000011 servlet       I com.ibm.ws.webcontainer.servlet.ServletWrapper init SRVE0242I: [MAXIMO] [/mbo] [ReportEngineStartupServlet]: Initialization successful.
[11/12/14 9:04:01:346 CET] 00000011 SystemOut     O 12 Nov 2014 09:04:01:335 [ERROR] [] [] BMXAA6421E - The system could not connect to the JDBC source: jdbc:oracle:thin:@localhost.:1521:ctginst1ORA-28001: the password has expired

[11/12/14 9:04:01:346 CET] 00000011 SystemOut     O 12 Nov 2014 09:04:01:346 [ERROR] [] [] BMXAA6418E - There was an error reloading the MAXPROP cache: access#DBConnectFail
[11/12/14 9:04:01:346 CET] 00000011 SystemOut     O 12 Nov 2014 09:04:01:346 [ERROR] [] [] BMXAA6538E - Failed to initialize MAXIMO business object services.
psdi.util.MXSystemException: access#DBConnectFail
at psdi.server.MaxPropCache.reloadCache(MaxPropCache.java:586)
at psdi.server.MaxPropCache.reload(MaxPropCache.java:251)
at psdi.server.MXServer.start(MXServer.java:3173)
at psdi.servlet.MAXIMOStartupServlet.init(MAXIMOStartupServlet.java:70)
at com.ibm.ws.webcontainer.servlet.ServletWrapper.init(ServletWrapper.java:358)
at com.ibm.ws.webcontainer.servlet.ServletWrapperImpl.init(ServletWrapperImpl.java:169)
at com.ibm.ws.webcontainer.servlet.ServletWrapper.initialize(ServletWrapper.java:1809)
at com.ibm.wsspi.webcontainer.extension.WebExtensionProcessor.createServletWrapper(WebExtensionProcessor.java:98)
at com.ibm.ws.webcontainer.webapp.WebApp.initializeTargetMappings(WebApp.java:704)
at com.ibm.ws.webcontainer.webapp.WebApp.commonInitializationFinally(WebApp.java:435)
at com.ibm.ws.webcontainer.webapp.WebAppImpl.initialize(WebAppImpl.java:304)
at com.ibm.ws.webcontainer.webapp.WebGroupImpl.addWebApplication(WebGroupImpl.java:100)
at com.ibm.ws.webcontainer.VirtualHostImpl.addWebApplication(VirtualHostImpl.java:166)
at com.ibm.ws.webcontainer.WSWebContainer.addWebApp(WSWebContainer.java:731)
at com.ibm.ws.webcontainer.WSWebContainer.addWebApplication(WSWebContainer.java:616)
at com.ibm.ws.webcontainer.component.WebContainerImpl.install(WebContainerImpl.java:376)
at com.ibm.ws.webcontainer.component.WebContainerImpl.start(WebContainerImpl.java:668)
at com.ibm.ws.runtime.component.ApplicationMgrImpl.start(ApplicationMgrImpl.java:1122)
at com.ibm.ws.runtime.component.DeployedApplicationImpl.fireDeployedObjectStart(DeployedApplicationImpl.java:1319)
at com.ibm.ws.runtime.component.DeployedModuleImpl.start(DeployedModuleImpl.java:610)
at com.ibm.ws.runtime.component.DeployedApplicationImpl.start(DeployedApplicationImpl.java:944)
at com.ibm.ws.runtime.component.ApplicationMgrImpl.startApplication(ApplicationMgrImpl.java:725)
at com.ibm.ws.runtime.component.ApplicationMgrImpl.start(ApplicationMgrImpl.java:2046)
at com.ibm.ws.runtime.component.CompositionUnitMgrImpl.start(CompositionUnitMgrImpl.java:439)
at com.ibm.ws.runtime.component.CompositionUnitImpl.start(CompositionUnitImpl.java:123)
at com.ibm.ws.runtime.component.CompositionUnitMgrImpl.start(CompositionUnitMgrImpl.java:382)
at com.ibm.ws.runtime.component.CompositionUnitMgrImpl.access$300(CompositionUnitMgrImpl.java:110)
at com.ibm.ws.runtime.component.CompositionUnitMgrImpl$CUInitializer.run(CompositionUnitMgrImpl.java:949)
at com.ibm.wsspi.runtime.component.WsComponentImpl$_AsynchInitializer.run(WsComponentImpl.java:349)
at com.ibm.ws.util.ThreadPool$Worker.run(ThreadPool.java:1604)
Caused by: java.sql.SQLException: ORA-28001: the password has expired


The error is clear: ORA-28001: the password has expired.
Since this is a Oracle error, the expired password must that of the database schema for Maximo.

To solve this problem we need to reset the Maximo database password in Oracle. I log in to the database with SQL developer as the sys user.

To reset the password you can run the follwoing statement:

ALTER USER maximo IDENTIFIED BY maximo;

This will reset the password for the maxmo user to 'maximo'

But I do not want the password to expire again. So I want to set the profile to never expire. First I need to know what profiles there are;

select profile from dba_users where username = 'SYSTEM';


Then on the profile I can set the password to never expire with the following statement;

alter profile default limit password_life_time unlimited;

After you have set this, you need to reset the password again, so the new password will use the new rules.

ALTER USER maximo IDENTIFIED BY maximo;

GNZ.

Sunday, November 9, 2014

WP App part 3 - "the Manual Automatic" - Use images / Taking photo's and storing them in the DataModel

Goal:
Create the functionality to use images from the phone / take image with my phone for my Windows Phone App 'The Manual Automatic" 


Check the first setup in part 1:
http://sometimesiliketopretend.blogspot.com/2014/09/windows-phone-app-part-1-manual.html

Check the setup of the DataModel in part 2:
http://sometimesiliketopretend.blogspot.com/2014/09/wp-app-part-2-manual-automatic-setting.html


Part 3 - Use images / Taking photo's and storing them in the DataModel

An important part of my App are the images / photo's of the manuals you can add to the title and description. They contain the part of the manual you need. So I need the use to be able to take a picture of choose a file from his phone.


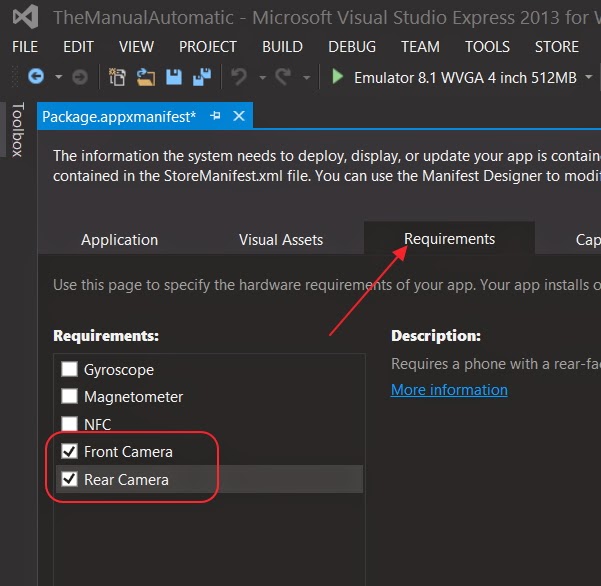
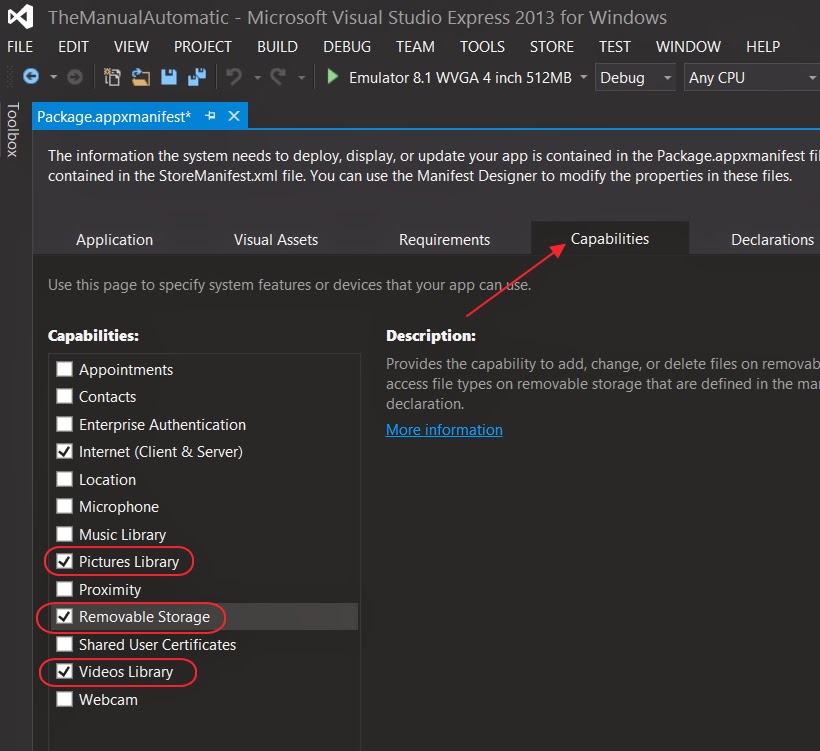
Step 1 - Enabling camera functionality

First we need to enable access to the Camera and the Storage card. This is done in the Package.appxmanifest.


Step 2 - Using the FilePicker

In order to Pick a file from the phone or snap a picture, I use the FilePicker finctionality of the phone. This is standard phone behaviour and would be nice to use. 

I searched for an example of this and found a series of jumpstart lessons.

Jumpstart series - Building Apps for Windows Phone 8.1:
http://channel9.msdn.com/Series/Building-Apps-for-Windows-Phone-8-1

I watched lesson 17 - Camera, Media and Audio in Windows Phone 8.1: http://channel9.msdn.com/Series/Building-Apps-for-Windows-Phone-8-1/17

I use the code form the first demo from the jumpstart lesson.

I also need the Reference WriteableBitmapEx.WinRT because when I added some of the code from the lesson I ecountered this error when building:


'Windows.UI.Xaml.Media.Imaging.WriteableBitmap' does not contain a definition for 'FromStream' and no extension method 'FromStream' accepting a first argument of type 'Windows.UI.Xaml.Media.Imaging.WriteableBitmap' could be found (are you missing a using directive or an assembly reference?)

I right click on the References, and choose "Manage NuGet Packages"


I search for 'writable' and install the pakage


Then when buildign I ran into this Build error:

The type or namespace name 'FileOpenPickerContinuationEventArgs' could not be found (are you missing a using directive or an assembly reference?)

After searching on MSDN I found out it is in the 'Windows.ApplicationModel.Activation' namespace. check http://msdn.microsoft.com/en-us/library/windows/apps/xaml/windows.applicationmodel.activation.fileopenpickercontinuationeventargs.aspx

But that is already added to my using list. 

My using list of the App.xaml.cs:


So I did some digging on the internet and stumbled upon this post:
http://msdn.microsoft.com/en-us/library/windows/apps/xaml/dn614994.aspx

Seems like since I used a Blank Template and that's why I am missing some basic functions...

Quote from the msdn site:
To call a FileOpenPicker and continue your app
  1. Include the SuspensionManager helper class in your project. This class simplifies lifecycle management for your app. To get the SuspensionManager helper class, create a new Windows Phone app that uses a project template other than the Blank App template. The SuspensionManager.cs file is in the Common folder of the project.
  1. Include a helper class like the custom ContinuationManager helper class in your project. This class includes interfaces and methods that make it easier to continue your app. To get the code for the ContinuationManager helper class, download the File picker sample, or see How to continue your Windows Phone app after calling an AndContinue method.

So I open a Hub App Template and check whats inside the Common folder.


I copied the Common folder of the Hubapp template to the Shared namespace of my own app in Visual Studio.


I renamed the namespace (just type a new name and choose the option to rename the namespace that becomes available:


Then I opened the File picker example folder to copy the ContinuationManager.cs


After adding the code I still get the Build error:

The type or namespace name 'FileOpenPickerContinuationEventArgs' could not be found (are you missing a using directive or an assembly reference?)

Aaarrgggg. 

So back to google...
After searching and trying different things I see that some code can but put specifically in for Windows Phone. You just have to put it between these tags: 

#if WINDOWS_PHONE_APP

#endif


When I put the code with the FileOpenPickerContinueEventsArgs between these statements it compiles!

Like so in the App.xaml.cs:

#if WINDOWS_PHONE_APP
        
        // Entry point for new WP 8.1 Contract-based activation like FileOpenPicker
        protected override void OnActivated(IActivatedEventArgs args)
        {
            var fopArgs = args as FileOpenPickerContinuationEventArgs;
            if (fopArgs != null)
            {
                // Pass the picked files to the subscribed event handlers
                // In a real world app you could also use a Messenger, Listener or any other subscriber-based model
                if (fopArgs.Files.Any() && FilesOpenPicked != null)
                {
                    FilesOpenPicked(fopArgs.Files);
                }
            } 
        }

#endif


So I clean up my code and start over with the example from the jumpstart lesson.
I include the above in the App.xaml.cs and the code below in the AddManual.xaml.cs

These are just snippets of the code, I can't post all the code here, but it should give a good idea of what I am doing.

private void addImageButton_Click(object sender, RoutedEventArgs e)
{
    // Pick photo or take new one
    var fop = new FileOpenPicker();
    foreach (var fileType in SupportedImageFileTypes)
    {
        fop.FileTypeFilter.Add(fileType);
    }
    fop.PickSingleFileAndContinue();                        

}


private async void OnFilesOpenPicked(IReadOnlyList<StorageFile> files)
{
    // Load picked file
    if (files.Count > 0)
    {
        // Check if image and pick first file to show
        var imageFile = files.FirstOrDefault(f => SupportedImageFileTypes.Contains(f.FileType.ToLower()));
        if (imageFile != null)
        {
            // Use WriteableBitmapEx to easily load from a stream
            using (var stream = await imageFile.OpenReadAsync())
            {
                originalBitmap = await new WriteableBitmap(1, 1).FromStream(stream);
                RandomAccessStreamReference rasr = RandomAccessStreamReference.CreateFromStream(stream);
                var streamWithContent = await rasr.OpenReadAsync();
                buffer = new byte[streamWithContent.Size];
                await streamWithContent.ReadAsync(buffer.AsBuffer(), (uint)streamWithContent.Size, InputStreamOptions.None);
            }
                    
            Image.Source = originalBitmap;

        }
    }
}


Next I put up a button to add and image.


When I click on it the Button the FilePicker is opened


I can snap a picture and/or choose a photo. Then the picture is shown on the page. :)

Next step is to actually save the picture in my json. I wll do that part in a next post because this is getting a bit long now.


GNZ.


References:

From the jumpstart series - Building Apps for Windows Phone 8.1:
http://channel9.msdn.com/Series/Building-Apps-for-Windows-Phone-8-1

I watched lesson 17 - Camera, Media and Audio in Windows Phone 8.1: http://channel9.msdn.com/Series/Building-Apps-for-Windows-Phone-8-1/17

Done some reading in these posts, but didn;t really used them: Quickstart: Capturing video by using the MediaCapture API:
http://msdn.microsoft.com/en-us/library/windows/apps/xaml/dn642092.aspx

Monday, October 6, 2014

Maximo 7.5 my First Workflow

Goal:
Use Workflow in Maximo to assign the flow of a request to different roles (groups of persons) 

Example:
I have a record in a cloned application that has to go through some different statuses. For example, it has to be "Approved", set to "In Progress", then "Closed".

I want to assign these changes to person(groups) so they get a message in the inbox on their startcenter. 

For more information about workflow I used this "Workflow Implementation Guide": http://publib.boulder.ibm.com/infocenter/tivihelp/v49r1/topic/com.ibm.mbs.doc/pdfs/pdf_mbs_workflow.pdf

and this link is also usefull:

https://www.ibm.com/developerworks/community/blogs/a9ba1efe-b731-4317-9724-a181d6155e3a/entry/creating_workflow_process2?lang=en


Solution:

Step 1 - Create a simple overview

In this example I just want to put a new record in the workflow, let someone determine if the record should be approved or cancelled.


Step 2 - Create Actions
In this example the record either gets approved or cancelled. I need actions to perform those status changes in out application.

First go to the Action application and add the actions. Go-To -> System Configuration -> Platform Configuration -> Actions 

I create two actions: 


Note 1: 
I use a cloned application, it is a clone of the SR application, that is why i use the SR object.

Note 2:
The APPR and CAN statuses are not default in the SR object. I added those to the SRSTATUS domain. 


Step 3 - Create Roles and Persongroups

When creating Tasks in a workflow, these task will need to be assigned to a role. These roles will be Person Groups in this example. So we first need to create "Person Groups" and then add those Person Groups to the Roles.

Add the Persongroup:


Do not forget to add at least one actual person to the Person Group, otherwise the following error will occuur when testing the workflow:

BMXAA4473E - No assignments created for task <TASKNAME> in workflow process <WFPROCESSNAME>

Add the Role:


Step 4 - Create the workflow

From the Implementation Guide I got this table with the different nodes available in a workflow.


Type of Node
Description
Lines permitted
entering a node
Lines permitted or
required exiting a
node
Start node

Indicates the point when a record starts a workflow process. When you create a process, a single start node displays on the canvas. Each process can have only one start node. You cannot delete start nodes.
None.
One positive line is required
Condition node


Indicates an evaluation of the record, based on data in the record. Use a condition node to enable a true evaluation or a false evaluation of the record, and then direct the record based on that evaluation. When a condition node is generated, it evaluates the record based on the Structured Query Language (SQL) statement defined in the properties for the node. The record is then routed to either the positive connection line or to the negative connection line exiting the node. You can use the SQL Expression Builder tool, accessed from the Workflow Configuration > Escalations application, to create an SQL statement.
One or more positive
lines; one or more
negative lines.
One positive line and
one negative line are required.
Interaction node

Provides an option for a user interaction with a record. Use interaction nodes to guide a user through a structured interaction with a record. A process can have one or more interaction nodes. You do not have to include interaction nodes in a process. A manual input node precedes an interaction node. If an interaction node leads to an application not related to the object on the process record, place a stop node after the interaction node. The original process shuts down as the new record displays.
One or more positive
lines; one or more
negative lines.
One positive line is
permitted.
Manual input node

Indicates a need for user input because there are multiple directions that a record can take in a process. Use a manual input node to have the assignee decide what happens next. When a manual input node is generated, a window displays. The manual input window contains a menu of options for routing the record. When the assignee selects an option, any actions or notifications associated with the option are triggered.
One or more positive
lines; one or more
negative lines.
More than one
positive line is
required. Negative
connections exiting
the node are not
allowed.
Subprocess node

Indicates that a separate workflow process is contained within another workflow process. Use a subprocess node to break down a complicated business process into smaller, self-contained units. For example, you could have a subprocess that handles records in different sites, or that handles different classes of work orders. When the record encounters a stop node within a subprocess, the stop node is returned to the main process. The stop node is returned at the same point where it left the process and on the same type of routing line on which it finished.
One or more positive
lines; one or more
negative lines.
One positive line and
one negative line are required.
Task node

Indicates when a user is to be given an Inbox assignment. The user has two choices. For example, the user can either approve a record or reject a record. Use task nodes when your business process requires that a user evaluate a record. Create a task assignment that routes the record to one or more individuals. Workflow comes to a stop at a task node until the assigned user has routed the record.
One or more positive
lines; one or more
negative lines.
One positive line is
required; one
negative line is
allowed.
Wait node

Indicates that the progress of a record through a process pauses until a required condition is met. Use a wait node to create a reaction to a database event, such as a status change, or a record update. A process can have one or more wait nodes. You do not need to include wait nodes in a process. A wait node cannot precede a node that requires user interaction, such as an interaction node or a manual input node.
One or more positive
lines; one or more
negative lines.
One positive line is
required.
Stop node

Marks the end of a workflow process. That is, the point where a record leaves control of the process. When you create a process, a single stop node is placed on the canvas. Use the stop node tool in the palette to place additional stop nodes on the canvas.
One or more positive
lines; one or more
negative lines.
None.

For this example I want the user to get an Inbox assignment. From this assignment he needs to evaluate the record and either approve it or cancel it.

Looking in the table I want to use a 'Task node'

First I open the 'Workflow Designer' (Go-To -> System Configuration -> Platform Configuration -> Workflow Designer)

Then I create a new Workflow Process, give it a name, description, and since I am using it on a Clones application of SR, use SR as the object:


Save the Process.

Next I drag a Task Node onto the canvas.


Then I grap the "Connect Nodes" pencil and drag a line between the Start node and the Task node, and a line between the Task node and the Stop node.


Then I drag a "Negative" line from the Task Node to the Stop Node.


The connections I created are 'Actions' in Workflow. To modify a Action, I simply double click on the positive (black) arrow between the Task node and the Stop node.

The "Action" properties pop-up and I fill it in like so:


Then I double click the negative (red) arrow and fill it in:


I save the Process

Next I want to configure what group of users is assigned to this task.
I double click on the Task node and fill it in like shown below:


Mind the Application fields! I use a clone of SR, so I need to make sure it is changed here.

Next I do the following steps fro mthe 'Select Action' menu: 

  • Validate Process
  • Enable Process
  • Activate Process


I save the record.


Step 5 - Test the workflow

I create a new record in my cloned application, save it and click the "Route Workflow" button:


Now I log out, and log back in as the PIAPPR user, that is linked to the PIAPPR person referenced in the PIAPPR person group.

This user has an Inbox configured, and I configured some fields in this Inbox:


There are two options to click on in this Inbox, Either click on the description, the record will open. You can view it, and if you want you can click the "Route Workflow" icon from there to open the "Workflow Assignment" dialog

Or click on the "Route Workflow" icon, to open the record and directly open the "Workflow Assignment" dialog.

In the "Workflow Assignemnt" dialog I can choose from the actions I configured in the Workflow:


After choosing one of the options, the workflow ends and the status is changed:


So there it is, a very basic Workflow. 

GNZ