Monday, September 14, 2015

Installing Maximo 7.6 with DB2 on Hyper-V

Goal:
Install Maximo 7.6 with DB2 database on a Windows 2012 server in Hyper V


Existing Configuration:

Previously I used VMWare for my VM's. With my Windows Phone development I use hyper V for Emulators. Hyper-V can also be used for other virtual Machines, so why not use it for Maximo VM's 

My Hyper-V machine setup:
  • Windows Server 2012
  • 8GB RAM (dynamic)
  • One disk, 85 GB

Used Documents:


Step 1: Setting up the needed files

I extracted all the zip files listed below in one directory:

  • MAM_7.6.0.0_WIN64.zip
  • Middl_Inst_DB2_105_Win_x86-64.zip
  • Middl_Inst_WAS_855_1of3_Win.zip
  • Middl_Inst_WAS_855_2of3_Win.zip
  • Middl_Inst_WAS_855_3of3_Win.zip


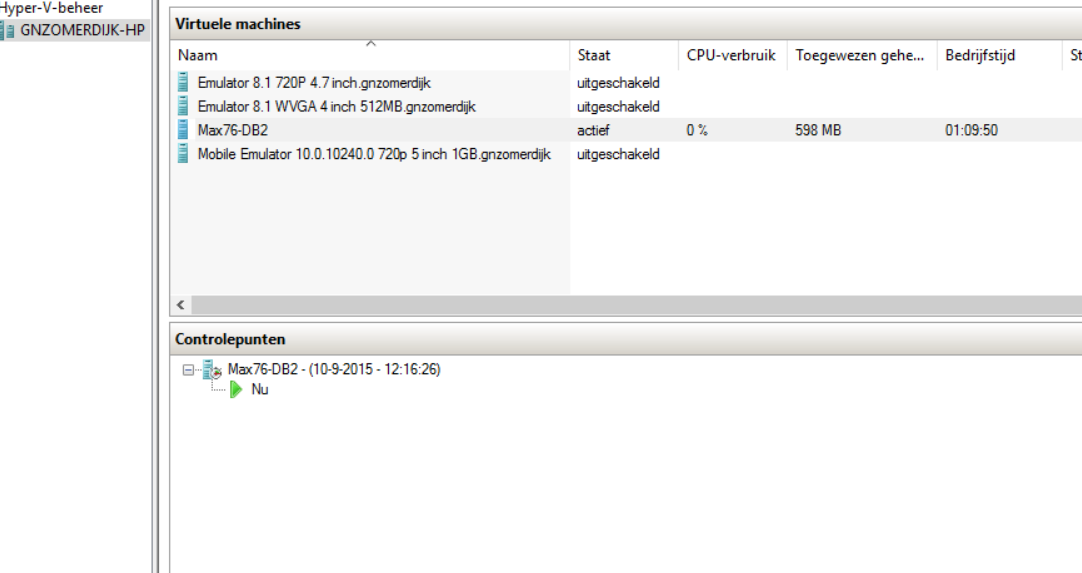
Next I create a Snapshot in Hyper-V.
So if I want to start again, I just revert to the snapshot.  (screenshot below is in Dutch)


Step 2: Installing

Right click on launchpad64.exe and choose "run as Administrator"


Next I follow the steps provided in the IBM Blog (see link at top of this post) I will only describe any abnormalities in details. Otherwise I just follow the IBM Blog.

I select "Install Product" on the left side, leave the options as is and click the link "Install IBM Maximo Asset Management components"


I make sure all packages are selected and click [Next]


On the Install Packages screen accept the license agreements and click [Next]


I accept the defaults and click [Next]


Again not modifying anything and clicking [Next]

In the following also clicking [Next] (using English language)

In the following screen the Features are shown, I do not change anything, and click [Next]

Now the DB2 installation page is shown. I leave the defaults and enter a password that meets the complexity rules of the Windows server and I check the option "Use the DB2 administration server user password"  See at the bottom of this blog post what happend when i entered a simple password.


I accept the defaults on the IBM HTTP Server screen and click [Next]

Finally, on the summary page I click [Install]


The files are being retreived and installed


After a while everything is installed


Step 3: Prepare Websphere

I Click [Finish] and the "IBM Tivoli process automation engine configuration utility" launches


There I click on "Prepare Websphere Application Server for configuration"

I leave everything as-is and click [Next]


On the next screen I scroll down and enter the password for Websphere and click [Next]


I want the service to run as the local system account and click [Next]


Next make you choice for Authentication, I use the default and click [Next]


I leave all the options checked and click [Finish]


Step below takes a very long time:


Finally I got: (one hour later)


Step 4: Configure websphere

When finished the "IBM Tivoli process automation engine configuration utility" is shown 
again. The Prepare option is gone, now I click on the "Configure a new Deployment" link


I leave the defaults in the next screen and enter a password in the "Use a default password value for all password values" and click [Finish]


The next screen shows some configuration options, I check the "Create sample data in the database" and click [Next]


Now the DB2 database information is shown,

I change the database password to "maximo" and click [Next]


I check the box "Enable full text search" and click [Next]


I leave the next screen as-is and click [Next]


I change the passwords for easy reference and click [Next]


I set the Base language to English and select Dutch as Additional Language


In the next screen i first only select Validate, like on the IBM blog and click [Finish]


I get an Validation error


The error is on the DB2 Instance

[10:39:42 AM CEST] DB2 Instance-CTGIN2032E: The port number is not listening on the host.
[10:39:46 AM CEST] Apply Deployment Operations-CTGIN5135E: Error configuring the database for DB2 Text Search. Unable to connect to the database specified.
[10:39:46 AM CEST] Apply Deployment Operations-CTGIN5009E: Validation of properties for reconfiguration failed. See previous messages for information on the failure.

So it seems because I enabled Full Text Search the database must exist...
I go back and disable the Full Text Search


then I go back to the Validation and click [Finish] again.
Now the following error shows:


[10:48:27 AM CEST] Apply Deployment Operations-Starting validation and configuration ....
[10:48:29 AM CEST] DB2 Instance-CTGIN2032E: The port number is not listening on the host.
[10:48:30 AM CEST] Apply Deployment Operations-CTGIN5009E: Validation of properties for reconfiguration failed. See previous messages for information on the failure.

So DB2 is not available

I change the port to 50000 and click [Finish] again


Again a error

[10:50:57 AM CEST] Apply Deployment Operations-Starting validation and configuration ....
[10:51:00 AM CEST] Apply Deployment Operations-Validating application server parameters...
[10:51:10 AM CEST] Apply Deployment Operations-CTGIN5059I: Property validation check completed successfully. All required properties were found.
[10:51:10 AM CEST] Apply Deployment Operations-CTGIN2094I: The preCheck function completed successfully.
[10:51:10 AM CEST] Apply Deployment Operations-CTGIN5060E: Authentication to WebSphere Application Server Deployment Manager win2k12.local.com with user name wasadmin failed because the user doesn't exist or the password is incorrect.
[10:51:10 AM CEST] Apply Deployment Operations-CTGIN5009E: Validation of properties for reconfiguration failed. See previous messages for information on the failure.
[10:51:10 AM CEST] Apply Deployment Operations-Validating database parameters...
[10:51:13 AM CEST] Apply Deployment Operations-CTGIN2102E: Error: Cannot connect to the database with user maximo.
[10:51:13 AM CEST] Apply Deployment Operations-CTGIN5009E: Validation of properties for reconfiguration failed. See previous messages for information on the failure.


Cannot connect to the database... that is no suprise because the database isn't there yet... I go and check the IBM blog.

I cancel the screen and click on "Configure a New Deployment" again. No I check the "Create and configure the database" and fill in the Windows Server information and click [Finish]
 In the screenshot on the IBM blog this was not filled in, But I guess we need to create the database here. 


Now I fill in the steps again. Now some steps have som additional information, like on the screenshots on the IBM blog. 

I leave all the defaults (but do check the "Enable full text search" and set some passwords to other values.)

No the validation goes and I get a question about wanting to complete the other steps. I click [Yes]


I check all the boxes and click [Finish]


All options will now be installed.

I started on 11:09, the progss can be viewed in the Console below


After a while I got an error:


[11:21:10 AM CEST] Apply Deployment Operations-CTGIN2321E: The port number 50000 is in use on win2k12.local.com.


I go back to the DB2 Instance page and change the port to 50005 and click [Finish]
This was the port we set up earlier for ctginst1


Now the setup continues. Something that ditn't not match in the IBM Blog, but I should have seen it when following the blog. So make sure you think about what you fill in :)

Now the user fails, so must be a password I missed.


[11:53:24 AM CEST] Apply Deployment Operations-CTGIN5398E: Unable to connect to the database. The userid 'maximo' and password combination were not accepted by the database system.
[11:53:24 AM CEST] Apply Deployment Operations-[jcc][t4][2013][11249][4.11.69] Connection authorization failure occurred.  Reason: User ID or Password invalid. ERRORCODE=-4214, SQLSTATE=28000

[11:53:24 AM CEST] Apply Deployment Operations-CTGIN2102E: Error: Cannot connect to the database with user maximo.

I re-enter the password on the DB2 information and click [Finish] again.

Now the installer get to the part of creating the database


This is part of the log when rechecking the maximo user information:

[11:56:20 AM CEST] Apply Deployment Operations-Starting validation and configuration ....
[11:56:23 AM CEST] Apply Deployment Operations-CTGIN5110I: Successfully connected to the database.
[11:56:23 AM CEST] Apply Deployment Operations-CTGIN5109I: DB2 database server version 10.5.400.191 meets the requirements for DB2 Text Search support.
[11:56:23 AM CEST] Apply Deployment Operations-Validating application server parameters...
[11:56:23 AM CEST] Apply Deployment Operations-Application server parameter validation successful.
[11:56:23 AM CEST] Apply Deployment Operations-Validating database parameters...
[11:56:24 AM CEST] Apply Deployment Operations-CTGIN5398E: Unable to connect to the database. The userid 'maximo' and password combination were not accepted by the database system.
[11:56:24 AM CEST] Apply Deployment Operations-[jcc][t4][2013][11249][4.11.69] Connection authorization failure occurred.  Reason: User ID or Password invalid. ERRORCODE=-4214, SQLSTATE=28000
[11:56:27 AM CEST] Apply Deployment Operations-CTGIN5398E: Unable to connect to the database. The userid 'maximo' and password combination were not accepted by the database system.
[11:56:27 AM CEST] Apply Deployment Operations-[jcc][t4][2013][11249][4.11.69] Connection authorization failure occurred.  Reason: User ID or Password invalid. ERRORCODE=-4214, SQLSTATE=28000
[11:56:27 AM CEST] Apply Deployment Operations-Database parameter validation successful.
[11:56:27 AM CEST] Apply Deployment Operations-Saving configuration parameters...
[11:56:27 AM CEST] Apply Deployment Operations-Starting configuration...
[11:56:28 AM CEST] Apply Deployment Operations-CTGIN5398E: Unable to connect to the database. The userid 'maximo' and password combination were not accepted by the database system.
[11:56:28 AM CEST] Apply Deployment Operations-[jcc][t4][2013][11249][4.11.69] Connection authorization failure occurred.  Reason: User ID or Password invalid. ERRORCODE=-4214, SQLSTATE=28000
[11:56:28 AM CEST] Apply Deployment Operations-CTGIN5398E: Unable to connect to the database. The userid 'maximo' and password combination were not accepted by the database system.
[11:56:28 AM CEST] Apply Deployment Operations-[jcc][t4][2013][11249][4.11.69] Connection authorization failure occurred.  Reason: User ID or Password invalid. ERRORCODE=-4214, SQLSTATE=28000
[11:56:28 AM CEST] Apply Deployment Operations-CTGIN5010I: Validation of pending updates completed successfully.
[11:56:28 AM CEST] Apply Deployment Operations-CTGIN5011I: Saving updated property values.
[11:56:29 AM CEST] Apply Deployment Operations-CTGIN5068I: The configuration of the environment has started.
[11:56:31 AM CEST] Apply Deployment Operations-CTGIN5071I: System users required for DB2 access were created successfully and assigned to appropriate system user groups.
[11:56:32 AM CEST] Apply Deployment Operations-CTGIN2089I: Process automation engine database instance has previously been created. Instance creation task skipped.
[11:56:32 AM CEST] Apply Deployment Operations-CTGIN2087I: Process automation engine database has previously been created. Database creation task skipped.
[11:56:33 AM CEST] Apply Deployment Operations-CTGIN2135I: Table space MAXDATA created successfully.
[11:56:33 AM CEST] Apply Deployment Operations-CTGIN2135I: Table space MAXINDEX created successfully.
[11:56:33 AM CEST] Apply Deployment Operations-CTGIN2135I: Table space MAXTEMP created successfully.
[11:56:33 AM CEST] Apply Deployment Operations-CTGIN2085I: Process automation engine database user has previously been created. User creation task skipped.
[11:56:35 AM CEST] Apply Deployment Operations-CTGIN2123I: The database user maximo was configured.
[11:56:35 AM CEST] Apply Deployment Operations-CTGIN5426I: Multi-tenancy is not enabled.

[11:56:36 AM CEST] Apply Deployment Operations-CTGIN5372I: Running the maxinst task to create the database. This task can take an extended period of time to complete, based upon your environment.

The process started at 11:56 and finished at 13:59. So it took over 2 hours to complete


I Click [OK]

Maximo should be running now.

I navigate to http://win2k12.local.com/maximo/ and ad the site to the trusted sites


And I login to maximo with the maxadmin account


Up and Running.


Problem installing DB2, maybe usefull for someone encoutering the same problem:

On my first try I got the following error:

Error during "install" phase:
An error occured while creating the user "db2admin" for the DB2 Administration Server. The return value is "5150"


I tried it again and got:

Explanation: The Ant process exited with code 1 while running C:\IBM\SQLLIB\TPAEAutomation\DB2_10\DB2_10.xml


When troubleshooting I tried to manually install DB2 and got another error.
When enetering 'dbadmin' as password i got the error 

password too short

I made the password longer, but the same error occured. Then I used a complex password and it was accepted. So in the procedure above I used a complex password and the installation went ok. 

So note that the installer will accept a standard password, but when installing it can fail.


GNZ


Monday, May 18, 2015

WP App - Enable developer mode in Windows 10 Tech Preview


Goal:
Use Visual Studio Community 2015 RC on Windows 10 Technical Preview to develop apps.

Problem:
When opening a project in Visual Studio 2015 RC I am told to enable developer mode, but this mode crashes the Settings Menu.

The message in Visual Studio:


In the Settings screen choose "Update & security"


Then click "For developers"


After a few seconds the Settings screen closes without a message...


Solution:
I used this page
http://answers.microsoft.com/en-us/insider/forum/insider_wintp-insider_install/enable-developer-mode-for-windows-10/c85a90b0-056a-4e32-894e-d9e0dd2a54df and just wanted to share my steps.


To set the developer mode use this:

Open gpedit.msc


I get two errors about:
"
Resource '$(string.OneDriveSettingCategory)' referenced in attribute displayName could not be found


File C:\Windows\PolicyDefinitions\SkyDrive.admx, line 9, column 78
"


I just clicked [OK] and navigated to


Local Computer Policy -> Computer Configuration -> Administrative Templates -> Windows Components -> App Package Deployment


Set the " Allows development of Windows Store apps and installing them from an integrated development environment (IDE)" 

Set it to Enabled.


Now my project loads and compiles


GNZ

Friday, May 15, 2015

WP App part 5 - "the Manual Automatic" - Copy Images to Local App Folder

Goal:
Create the functionality to use images from the phone / take image with my phone for my Windows Phone App 'The Manual Automatic" 


Previous parts:


First setup in part 1:
http://sometimesiliketopretend.blogspot.com/2014/09/windows-phone-app-part-1-manual.html

The setup of the DataModel in part 2:
http://sometimesiliketopretend.blogspot.com/2014/09/wp-app-part-2-manual-automatic-setting.html

Using the FilePicker in part 3:

http://sometimesiliketopretend.blogspot.com/2014/11/wp-app-part-3-manual-automatic-use.html

Saving and Loading images from and to a byte array in part 4:
http://sometimesiliketopretend.blogspot.com/2015/02/wp-app-part-4-manual-automatic-saving.html

Since in part 4 my efforts to store the images in a byte array backfired I decided to store the images in the local folder of my app.

In this post the goal would be to create a copy of the original image, store it in the local storage and store the imagename in my datamodel.

Step one - Modify the datamodel
In my datamodel I leave out the byte array and put in a string to store the only image name:


When storing the manual the Name of the image is saved.
In my ImageHelpers class I defined the public static variable for the location where I want to store the images and one with the default image.


Also two methods are available for showing an image from a RelativePath and one for converting a StorageFile to a BitmapImage

I used this page:

http://stackoverflow.com/questions/14883384/displaying-a-picture-stored-in-storage-file-in-a-metroapp


Step two - Copy the image
I want the images to be put in a seperate folder in my local app storage.

For some general function when working with the files and directory I create a Helper class named FileHelpers.

I have got the methods here, one to check if a file exists and one to check if a directory exists.


I used this page:
https://social.msdn.microsoft.com/Forums/windowsapps/en-US/570fcd6b-3270-4c47-b796-cf6bc5adb600/how-to-store-the-image-into-the-local-file-system

When adding a Manual, I check if the Directory is available, if not I create it and set the 'localFolder' to that directory:


//Create a copy of the picture
//Check for directory
bool folderExists = await FileHelpers.DoesFolderExistAsync(ImageHelpers.imagesFolder);
if (!folderExists)
{
    await Windows.Storage.ApplicationData.Current.LocalFolder.CreateFolderAsync(ImageHelpers.imagesFolder);
}

//change to the image subfolder

StorageFolder localFolder = await Windows.Storage.ApplicationData.Current.LocalFolder.GetFolderAsync(ImageHelpers.imagesFolder);


Then I check if the file I want to copy does not already exists (the name) and if it doesn't exist I copy the file

//check for fileexists in the subfolder
bool duplicateCheck = await FileHelpers.DoesFileExistAsync(imageFile.Name, localFolder);

//If file does not exists copy it
if (!duplicateCheck)
{
    await imageFile.CopyAsync(localFolder);
    //bmp = await ImageHelpers.LoadImage(imageFile);
    storeImageName = imageFile.Name;

}


If th file exists I add a timestamp to the filename and rename the file, This rename action also copies the file

else
{
    //Since the source is readonly, put it in a temp file, because we want to rename it.
    StorageFile tempFile = await localFolder.GetFileAsync(imageFile.Name);

    //Alter the Name with a unique timestamp number
    DateTime unixEpoch = new DateTime(1970, 1, 1);
    DateTime currentDate = DateTime.Now;
    long totalMiliSecond = (currentDate.Ticks - unixEpoch.Ticks) / 10000;
    string fileName = origDisplayName + "_" + totalMiliSecond.ToString() + tempFile.FileType.ToString();

    //The RenameAsync line also copies the file
    await tempFile.RenameAsync(fileName);
    storeImageName = fileName;

}

And finally I call the AddManual method in the Datamodel:


App.DataModel.AddManual(manualNameTextBox.Text, manualDescriptionTextBox.Text, storeImageName);
 
Step three - Testing
In order to test this I first used the command line tool to check the Isolated Storage of my app.
I used: https://msdn.microsoft.com/en-us/library/windows/apps/hh286408(v=vs.105).aspx to check the file from a command line.

But then I came across this nifty tool: https://isostorespy.codeplex.com/
Does the same but then with a nice GUI :)
So I checked if the directory was created, the file was copied and if, in case of duplicate names, the name was altered correctly. 

Works like a charm, very nice tool.


Next post will be on completing the app and various modifications I did.


GNZ.

Friday, February 13, 2015

Use an automationscript in a Condition node of a Workflow

Goal:
Use an automationscript in Maximo to calculate the outcome of a condition node in Maximo. 

Example:
I have a record with zero or more child records. e.g. a  Workorder with Task workorders. I also have a workflow and I want the Workorder only to be able to go in to the workflow if the Tasks all have the same Location.

Problem:
Whith the condition nodes in Workflow you can set an Expression. But how can I loop through task workorders within an expression? That would make a difficult expression. Looping through records (and doing a lot of other stuff) is much easier in an automation script. How can I use the best of both worlds?

Solution:
So I need to call an automationscript from a workflow. First I set up my basic workflow. For more information about that, see one of my previous posts, with information on setting up a basic workflow.
http://sometimesiliketopretend.blogspot.com/2014/10/maximo-75-my-first-workflow.html

My workflow:


When starting the workflow, the check is performed, and when not satisfactory a message is shown to the user and the workflow is stopped.

The condtion now needs to call my automation script.

Create the script on a Custom Condition Launchpoint:


I want the script to run on the workorder object:


Name the script:


Paste in the source code for the script and click the [Create] button


Source code script:

print "Start CHECKTASKLOC script";

from psdi.mbo import Mbo;
from psdi.server import MXServer;

'''
Date: 20150211
Author: G.N. Zomerdijk

Purpose of script:
Check if the location on all tasks are the same

The script will be run from a condition node in the Workflow

Custom Condition Launchpoint: WOFLOW on WORKORDER object

Useage in Workflow:
Condition Node with title: CHECKTASKLOC:WOFLOW   That is the <script name>:<launchpoint name>
Expression:   com.ibm.tivoli.maximo.script.ScriptCustomCondition
Custom Class: Y

For reference when we want to use it in a Condition:
Create the following condition:
Condition: TEST
Type: CLASS
Expression: CHECKTASKLOC:WOFLOW 
Condition class: com.ibm.tivoli.maximo.script.ScriptCustomCondition

Info:
Expression should hold launch point information: <script name>:<launchpoint name>

evalresult is returned, is an internal variable, no need to define it as variable in automationscript application.
'''

#set values for used variables
evalresult = True;
loc = "";

#Loop through the PRLINES
tasksFromWOSet = mbo.getMboSet("WOACTIVITY")
tasksFromWO = tasksFromWOSet.moveFirst()

while tasksFromWO is not None:    
    if (loc != "" and loc != tasksFromWO.getString("LOCATION")):
        evalresult = False;
        break;
    else:
        loc = tasksFromWO.getString("LOCATION");

    #get the next task
    tasksFromWO = tasksFromWOSet.moveNext();

print "evalresult: " + str(evalresult);

print "End CHECKTASKLOC  script";


The script returns a True or a False. This is done by setting the evalresult variable. See the code above for more detailed information.

Now in the workflow we can run the script by modifying the Condition Node.

Condition Node with title: CHECKTASKLOC:WOFLOW   That is the <script name>:<launchpoint name>
Expression: com.ibm.tivoli.maximo.script.ScriptCustomCondition

Custom Class: Y


After clicking OK I get:


Click OK in the error and Click OK again in the condition node. Do not know why the error occurs, but the second time around it is validated. Maybe because the Custom Class is checked, and only at the second run the Expression is validated as a Custom Class.

The workflow looks like this now:


Save the Workflow.

Next I associate the Workflow with the Workorder (WOTRACK) application


I only add support for the WOTRACK application, so deselect the rest of the application and click [OK]


Next Validate, Enable and Activate the process:


Create a workorder, with 3 task workorders.


On one of the tasks change the location from FOORBAR to FOOBAR2 and save the workorder.


Now I want to route the workorder in the workflow, but the button is grayed out... 


I go back to the workflow and go in the Select Action menu to the "Edit Workflow GO Buttons" 

There I add the Process Name to the existing Application row.


I save the workflow and open my workorder again.
Still grayed out... I decide to now logout maximo and log back-in.
Open the workorder again and the button is now available!


And now I get the message:


I change location on the second task to match the other tasks, save the workorder and hit the workflow button again.


Now the record is routed in the workflow: 


GNZ


Reference:
For more info about automationscripting I used the pdf from this page: https://www.ibm.com/developerworks/community/blogs/a9ba1efe-b731-4317-9724-a181d6155e3a/entry/scripting_with_maximo6?lang=en

For more information about workflow I used this "Workflow Implementation Guide": http://publib.boulder.ibm.com/infocenter/tivihelp/v49r1/topic/com.ibm.mbs.doc/pdfs/pdf_mbs_workflow.pdf

Saturday, February 7, 2015

WP App part 4 - "the Manual Automatic" - Saving and Loading images from and to a byte array

Goal:
Create the functionality to use images from the phone / take image with my phone for my Windows Phone App 'The Manual Automatic" 


Previous parts:


First setup in part 1:
http://sometimesiliketopretend.blogspot.com/2014/09/windows-phone-app-part-1-manual.html

The setup of the DataModel in part 2:
http://sometimesiliketopretend.blogspot.com/2014/09/wp-app-part-2-manual-automatic-setting.html

Using the FilePicker in part 3:

http://sometimesiliketopretend.blogspot.com/2014/11/wp-app-part-3-manual-automatic-use.html

It has been a little while since I posted about my project of developing the Manual Automatic app for Windows Phone. But a lot of work has been done since then. So now first I will show how I managed to store images in my Json datamodel.


Part 4 - Saving and Loading images in JSON

I want the images to be stored and not just referenced if all possible. That way it isn't lost if you delete the picture from your camarea library, because you might not want to have all those pictures of pages in your library.

So it would be great if the image can be stored in json.


Step 1 - Converting the image to a byte array and saving it
I want to store the picture in a array of ytes, so in my datamodel it looks like this:

    public class Manual
    {
        public int ID { get; set; }
        public string ManualName { get; set; }
        public string Description { get; set; }
        public DateTime Created { get; set; }
        public DateTime Changed { get; set; }
        public byte[] Image { get; set; }
    }

I have a byte array named Image.
After selecting the image with the FilePicker (see previous part) the WriteableBitmap originalBitmap variabele and the byte[] buffer variabele are filled. I used the originalBitmap to bind it to the Image control on the XAML.

private async void OnFilesOpenPicked(IReadOnlyList<StorageFile> files)
{
    // Load picked file
    if (files.Count > 0)
    {
        // Check if image and pick first file to show
        var imageFile = files.FirstOrDefault(f => SupportedImageFileTypes.Contains(f.FileType.ToLower()));
        if (imageFile != null)
        {
            using (var stream = await imageFile.OpenReadAsync())
            {
                originalBitmap = await new WriteableBitmap(1, 1).FromStream(stream);
                RandomAccessStreamReference rasr = RandomAccessStreamReference.CreateFromStream(stream);
                var streamWithContent = await rasr.OpenReadAsync();
                buffer = new byte[streamWithContent.Size];
                await streamWithContent.ReadAsync(buffer.AsBuffer(), (uint)streamWithContent.Size, InputStreamOptions.None);
            }
                    
            Image.Source = originalBitmap;

        }

    }
}


The buffer needs to be stored.
Since that allready is a byte[] I can simply store it in my DataModel.

So on the saveButton click event I do some checks and then call

App.DataModel.AddManual(manualNameTextBox.Text, manualDescriptionTextBox.Text, buffer);


There I set the buffer to the manual.Image ad call the sveManualDataAsync(); function

manual.ManualName = manualname;
manual.Description = description;
manual.Created = DateTime.Now;
manual.Changed = DateTime.Now;
manual.Image = buffer;

_manuals.Add(manual);


await saveManualDataAsync();

There the data will be save, see the previous post for more details.


Step 2 - Loading the Image and converting it back from byte[] to WritableBitmap.

From the Main page, where the user can search for records, they can click on the results and then it neds to open on a seperate page. On that page I want to show detailed record information and also the image. So there the byte{} needs to be converted back to an image.


On the Main page I use the code below to generate results;

private void genResult(DataModel.Manual manual)
        {
            TextBlock NameText = new TextBlock();
            NameText.Text = "Manual Name: " + manual.ManualName;
            NameText.FontSize = 22;
            //Store the manual in the Tag so we can pass it along
            NameText.Tag = manual;
            NameText.TextTrimming = TextTrimming.CharacterEllipsis;        
            NameText.Tapped += new TappedEventHandler(NameClickedEvent);
            
            
            TextBlock DescText = new TextBlock();
            DescText.Text = "Description: " + manual.Description;
            DescText.FontSize = 12;
            DescText.TextWrapping = TextWrapping.WrapWholeWords;

            TextBlock CreateText = new TextBlock();
            CreateText.Text = "Created on: " + manual.Created;
            CreateText.FontSize = 12;
            
            TextBlock IDText = new TextBlock();
            IDText.Text = "ID: " + manual.ID;
            IDText.FontSize = 12;

            TextBlock ImageStringText = new TextBlock();
            ImageStringText.Text = "ImageString: " + manual.ImageString;
            ImageStringText.FontSize = 12;

            
            resultStack.Children.Add(NameText);
            resultStack.Children.Add(DescText);
            resultStack.Children.Add(CreateText);
            resultStack.Children.Add(IDText);
            resultStack.Children.Add(ImageStringText);


        }

In the NameClickedEvent I navigate to the RecordPage

private void NameClickedEvent(object sender, TappedRoutedEventArgs e)
        {
            //Get the manual from the textblock tag and pass it along to the ReordPage
            TextBlock textBlock = sender as TextBlock;
            DataModel.Manual manual = textBlock.Tag as DataModel.Manual;

            Frame.Navigate(typeof(RecordPage), manual);
        }

On the RecordPage in the OnNavigatedTo I do the following:

 protected async override void OnNavigatedTo(NavigationEventArgs e)
        {
            //get the vars and get the one manual
            var manual = (DataModel.Manual)e.Parameter;
            
            
            //should not occur that the passed manual is empty but check anyway
            if (manual != null)
            {
                ManualNameTextBlock.Text = manual.ManualName.ToString();
                CreatedTextBlock.Text = CreatedTextBlock.Text + manual.Created.ToString();
                DescriptionTextBlock.Text = manual.Description.ToString();

                if (manual.Image != null)
                {
                    MemoryStream _stream = new MemoryStream(manual.Image);
                    ManualImage.Source = await new WriteableBitmap(1, 1).FromStream(_stream);
                }

                //Show a blank Image if no image is returned
                if (ManualImage.Source == null)
                    ManualImage.Source = ImageFromRelativePath(this, "Assets/empty.png");  
               
            }
            else
            {
                //show a message that searchterm is required
                string messageText = "Something went wrong, please go back and re-select a Manual";
                MessageDialog msgBox = new MessageDialog(messageText);

                await msgBox.ShowAsync();
            }


        }

So the byte[] is converted back to in WriteableBitmap and set to the source of the Image.

But an error occurs when I do just that:


An exception of type 'System.Exception' occurred in mscorlib.ni.dll but was not handled in user code

Additional information: The component cannot be found. (Exception from HRESULT: 0x88982F50)


If there is a handler for this exception, the program may be safely continued


I have no idea why this happens, and after searchig online for hours I still can't get it to work.
I use the same loading image from byte[] method to show the image after picked by the file picker and no error occurs. But when first storing it in the json file and the retreiving it messes it up...

At some point it worked, but after a few mote tests it broke again... Sounds stupid, but I cannot find a way to reproduce the corect working again... Something must be off.


After testing and searching I realize that this maybe isn't the best way to store images. In one of my tests I crate maybe 10 records with images and the json files grew to 11MB. So I van only imagine how big the files becomes after a while...
This will not be the correct way I gues

So i decide to not store the images in the json file. I now want to store a copy of the images in a folder in the Localfolder of the app. 

Once that is done I will post about it in a new blog post.

GNZ