Monday, June 23, 2014

Install and Enable a second language in Maximo 7.5.0.5

Goal:
Install a second language in Maximo 7.5.0.5 on a Windows 2012 server.

Problem:
I installed my Maximo 7.5.0.5
with the English language. Now I want to install Dutch as the second language.

When I login i want to have the option to select my language. Now there is no option for that:


Solution:

Step 1 - check if language if installed

Sometimes the language is installed but not enabled. Go to the installation directory and check if the language folder is located in tools/maximo. In this example I check my installation directory E:\ibm\SMP\maximo\tools\maximo


Check inside the folder for a folder named xliff and check if the folder contains data. For some languages the folders are there, but there only is a a_mif folder.


When you want to create a custom language you could edit the xliff files. Also if you want to check if the languae is available, you could open the files. Because if you open an xliff file you can see that it is a sort of xml type file you can read and edit


Step 2 - Install a language (optional)
  
If the language folder isn't available you can add it by running the Maximo installer. In this example I use a Windows 2012 server, so I use the method for starting the installed as described in a other post on this blog (http://sometimesiliketopretend.blogspot.com/2013/12/maximo-7505-on-windows-server-2012.html) So for more details why I run the installtion this way, refer to this post.

Start the Maximo installation:


Now just click through all the screens, as they will just tell you what is installed


It will tell me a newer version is installed since i run the 7.5.0.0 installer. Click [Next]


Then after a short while the screen with languages pops up.
It will show what languages are installed and you can check the languages to install. As you can see I also had the Spanish, German, French and Dutch language installed. Now I add the Danish language for the purpuse of testing this, and click [Next]


There already is a 'da' folder in the E:\ibm\SMP\maximo\tools\maximo locationBut it doesn't contain any data (except the a_mif)


I check both options and click [Next]


In the summary I click [Next]


Then I click [Install]


Wait untill it is finished


When finished a dialog pops up with the notification that warnings are reported in the log.


First I click [Done]  this way the logs will be unlocked and updated.
Then i navigate to E:\IBM\SMP\logs and open the CCMDB_install.log

I search for the warning and found it on line 561


Apparently the license could not be copied.

When i browse to E:\ibm\SMP\ there is no license folder.

There is however a E:\ibm\SMP\licensetemp\V7.5.0.0\Base_Services folder. In there .txt files are stored with the license agreement. So nothing to worry about I gues. Maybe another thing related to the installation in Windows Server 2012?

I decide to run the taskrunner. Open a Dosbox as Administrator and go to E:\IBM\SMP\scripts and run
taskRunner.bat CONTINUE STOPONERROR


So now we have the xliff files for the 'da' language in E:\ibm\SMP\maximo\tools\maximo.


Step 3 - Enable a language

Next we need to to tell Maximo to use the xliff files. I will enable the nl language

First we stop the MXServer.

Note: I tried to login to Websphere but got a 'This page can't be displayed'


Solved it by starting the ctgCellManager01 Service via the Windows Services manager.

Now i can login to Websphere and stop the MXServer


Now open a dosbox as Administrator and go to E:\IBM\SMP\maximo\tools\maximo and run TDToolkit -addlangnl


Wait until the task is finished.


Now we start the MXServer and go to the login screen of Maximo

And the enabled Language is now selectable:


GNZ


Wednesday, April 2, 2014

My points of attention when upgrading from 7.1.1.7 to 7.5.0.5

Goal:
Points of attention when upgrading from Maximo 7.1.1.7 to Maximo 7.5.0.5.

Problem:
Not really a problem, but after an upgrade from 7.1.1.7 to 7.5.0.5 I encountered some (relatively easy to fix) issues. It would have been nice if these issues where solved when upgrading.

Solution:
Just a little list of found issues when upgrading from 7.1.1.7 to 7.5.0.5.


Issue:
Communication templates with default name are overwritten

Solution:
Copy-pasted the description from an backup Maximo to the new Maximo.


Issue:
Refferential Jobplan doclinks not showing on workorder. Note that I use 'Jobplan revisions' in 7.5.0.5.

Solution:
In 7.5.0.5 with Jobplan Revision, an extra relationship is created on workorder (pluscdoclink) the default relationship (doclink) is also modified with the revision statement in the jobplan section of the where. (Bold and red in the example below)

((ownertable='WORKORDER' and ownerid=:workorderid)
or (ownertable='WOACTIVITY' and ownerid=:workorderid and :istask=1))
or (ownertable='ASSET' and ownerid in (select assetuid from asset where assetnum=:assetnum and siteid=:siteid))
or (ownertable='LOCATIONS' and ownerid in (select locationsid from locations where location=:location and siteid=:siteid))
or (ownertable='JOBPLAN' and ownerid in (select jobplanid from jobplan where jpnum=:jpnum and (siteid is null or siteid=:siteid) and pluscrevnum =:pluscjprevnum) )
or (ownertable='PM' and ownerid in (select pmuid from pm where pmnum=:pmnum and siteid=:siteid))
or (ownertable='SAFETYPLAN' and ownerid in (select safetyplanuid from safetyplan,wosafetyplan where safetyplan.safetyplanid=wosafetyplan.safetyplanid and wosafetyplan.wonum=:wonum and wosafetyplan.siteid=:siteid))
or (ownertable in ('SR','INCIDENT','PROBLEM') and ownerid in (select ticketuid from ticket,relatedrecord where ticketid=recordkey and ticket.class = relatedrecord.class and relatedrecclass=:woclass and relatedreckey=:wonum and relatedrecsiteid=:siteid))
or (ownertable in ('WOCHANGE','WORELEASE','WOACTIVITY') and ownerid in (select workorderid from workorder,relatedrecord where wonum=recordkey and workorder.woclass = relatedrecord.class and relatedrecclass=:woclass and relatedreckey=:wonum and relatedrecsiteid=:siteid))
or (ownertable='COMMLOG' and ownerid in (select commloguid from commlog where ownerid=:workorderid and ownertable in (select value from synonymdomain where domainid='WOCLASS')))
or (ownertable='SLA' and ownerid in (select slaid from sla,slarecords,workorder where sla.slanum=slarecords.slanum and slarecords.ownerid=workorder.workorderid and sla.objectname='WORKORDER' and slarecords.ownertable='WORKORDER' and workorder.wonum=:wonum))

The field pluscjprevnum is a new field on the workorder table. This contains all null values.
The pluscrevnum however is filled with 0. So the comparison isn't working here.
So we just need to fill the revisionnumber on the WORKORDER table.

select count(wonum)
from workorder
where pluscjprevnum is null
and jpnum is not null
and istask = 0
and historyflag = 0;

update workorder
set pluscjprevnum = 0
where pluscjprevnum is null
and jpnum is not null
and istask = 0
and historyflag = 0;

select w.wonum, w.jpnum, w.pluscjprevnum, j.pluscrevnum
from workorder w
 inner join jobplan j
 on j.jpnum = w.jpnum
where w.jpnum is not null;


select w.wonum, w.jpnum, w.pluscjprevnum, j.pluscrevnum
from workorder w
 inner join jobplan j
 on j.jpnum = w.jpnum
where w.jpnum is not null
and w.pluscjprevnum = '0';


Issue:
When selecting a Jobplan that has at least one revision on a PM in the 'Job Plan Sequence' tab the following error pops up:

Error we received: BMXAA4082E - The WHERE clause is either empty or returning more than one row for the crossover domain specified for {0} object. Use the Domains application to correct the WHERE clause.

Also when selecting a Jobplan with at least one revision on a Workorder not all the correct information of the jobplan was not copied to the workorder.

Solution:
We use two crossover domains to get jobplan information on pm and on workorders. These crossover domains had the following where clause:

jpnum=:jpnum

These needed to modified to take in account the active jobplan:

jpnum=:jpnum and status in (select value from synonymdomain where domainid='JOBPLANSTATUS' and maxvalue ='ACTIVE')


Issue:
Error message BMXAA4042 was reset to default.

Solution:
Copy pasted the Error message from a backup Maximo 7.1.1.7 installation.
You can find these message in  Database Configurion -> Select Action -> Messages


Issue:
Maximo is showing up all messed up. Icons are placed below each other and it is impossible to work with.


Solution:
We used the same DNS name for Maximo, so the screen needed a hard refresh in order to replace the cached pictures and stylesheets. 
First go back to the startcenter then press CTRL + F5 on the keyboard.


Issue:
Problem with the startcenters. Applications that are related are now also shown on the startcenter, even if the user does not have access to them. This was not the case in Maximo 7.1

Solution:
We need to build different startcenters for the some groups. In 7.1 we just used the same startcenter with a lot of applications on them. Application to which users where not authorized where not shown.


Issue:
There was a problem with the saved queries. The schema name was registered in some queries

Solution:
Fixed with query below.
Please check with you own environment, and test it first as always!

--checks
select * from query
where lower(clause) like '%maxprod%';

select clause, replace(clause, 'maxprod', 'maxprod75')
from query
where lower(clause) like '%maxprod%';

--the actual update
update query set clause = replace(clause, 'maxprod', 'maxprod75')
where lower(clause) like '%maxprod%';

--checks
select clause
from query
where lower(clause) like '%maxprod%';

select *
from query
where lower(clause) like '%maxprod75%';


Issue:
Now the queries works but the user still the following error on some queries if they want to edit them:

Solution:
IBM introduced an SQL Injection system property (mxe.db.sqlinjection) in later 7.1 versions and 7.5 versions. Guess it wasn't there yet in 7.1.1.7 :)

http://www-01.ibm.com/support/docview.wss?uid=swg21657644


GNZ


Tuesday, March 11, 2014

Automatically Refresh the Start Center for each user

Goal:
Bulk refresh a Start Center for all the users in Maximo 7.5.


Problem:
I updated the Start Center a lot of users use. Problem is that every user has to click on the ' Update Start Center' link in order to see the updates.

Solution:
Run a script that forces an update of the Start Center after a user logs in.
This can be done by deleting the layout associated with the user's Start Center and then deleting the Start Center config.
This solution requires that you can login on the Database with the maximo user.


First off, the start situation, a Start Center with three applications for the user GZOTEST;


Next I login as MAXADMIN to modify the Start Center template so that it contains a Bulletin Board;


I login as GZOTEST and the startcenter is not updated;


I need to click on 'Update Start Center' in the top right corner to see the Bulletin Board;


The changes are shown to the user. This is the manual method, and each user has to click on the 'Update Start Center' link in order to see our changes.


Now in order to show the changes automatically to the user.

First I wil change the Start Center again as MAXADMIN.


I added 'Inbox/Assignments' to the left column.

When I login as GZOTEST the changes are not shown:


Log out again and open a DB tool (I use SQL Developer)
Run the query: 

select * from scconfig;


For each user a record exists in this table. We can see the SCTEMPLATEID the user has assigned.

now run: 

select * from layout;


This shows all the elements assigned to the different users. When the user clicks on the 'Update Start Center' link this table is checked and updated. 

Next we want to delete all the records in the layout table and scconfig table matching the Start Center we want to update. In our example this is '2'
Run the two queries below to delete these records.

delete from layout
where scconfigid in
(
 select scconfigid
 from scconfig
 where sctemplateid = '2'
);

delete from scconfig
where sctemplateid = '2';


Do not forget to commit the changes to the database if you use an Oracle DB, like in my example.


Next I login to Maximo as GZOTEST again.


et voila, the Start Center shows the lastest addition, the 'Inbox / Assignments'


GNZ.


Wednesday, February 5, 2014

IE browser shows blank screen after loggin in to Maximo

Goal:
Enable the use of Maximo 7.5 in the Internet Explorer browser on a Windows Server when logged in on the Server through a Remote Desktop Session.

Problem:
The browser shows a blank screen after loggin in to Maximo on the server. 

Consultants often log in on application servers to (remotely) do Maximo stuff. They often want to test their modifications but Maximo is not always available publicly. So they need to test locally on the server they are logged in to. This is not possible when the Internet Explorer browser shows a blank screen after loggin in. Often they are are not permitted to change security settings on the server and installing a different browser is not something you want to do on a server.

Solution:
The latest versions of Internet Explorer browser (IE10 and up) on modern servers (Windows 2008 and up) are very thigtly secured when viewing pages from address outside the local server environment. You constantly have to add mark pages as secured to be able to view them. This is the reason Maximo often shows a blank page after loggin in. 


Option 1 - Adding the domain to the trusted sites in IE:

When navigating to Maximo often the servername is used:


After entering the credentials and loggin in the following message is displayed:


Click [Add] to add the page to the trusted sites. 


This way the security policies applied are different and Maximo will display correctly.


If for some reason the dialog above is not shown you can go to the Internet Options of the browser to add the site:


Click on the 'Security' tab and then click the [Sites] button


Type in the first part of the URL and click [Add]


Option 2 - Use localhost

It is also possible you do not have the option to add addresses to the trusted sites. Maybe because a policy is in place that prevents users from changing the Internet Options.

There is a solution for that. Change the servername in the address to localhost.

So the url would go from:

http://win2k12-01/maximo/

to

http://localhost/maximo/

This way the address is recognised by the browser as a local address and different security policies apply.


GNZ.

Wednesday, January 29, 2014

Show the Username and Default Insert Site in the Maximo header

Goal: 
To show the currently logged-in user and his Default Insert site in the header of the Maximo 7.5.0.5 application 

Problem:
When working in some Maximo applications (e.g. workorder and locations) in a multi-site environment the user must have the Default Insert site set to the site he wants to insert a new record for.

This information is displayed in Maximo through a menu, but the user will first have to open it. It would be nice to always show the user his Default Insert Site.

Solution:
Show the Default Insert site of the user in the header of Maximo.

In the header there is room for some information, like shown in the picture below:


Step 1 - Locate the file

In order to show information in this part of Maximo we need to modify the titlebar.jsp

This file is located in \IBM\SMP\maximo\applications\maximo\maximouiweb\webmodule\webclient\components

This is regardless of what skin you use.

Make a copy of titlebar.jsp as a backup in this directory. 


Modify the titlebar.jsp

After the line  (line 20):


String userFullName = control.getWebClientSession().getUserInfo().getDisplayName();

Enter the following lines:

String defSite= "";

try
{
  defSite= control.getWebClientSession().getUserInfo().getInsertSite();
}
  catch(Exception ex)
{
  defSite="Unknown";
}


In essention I create a variable that is empty. I try to get the user his InsertSite and put that in the variable. If no InsertSite exists I fill the variable with the text "Unknown"

Here a picture of the first change:


Then find the following block of code(original line number 130) :

<td style="vertical-align:<%if(useHomeButton){%>middle<%}else{%>top<%}%>;white-space: nowrap;">
    <span id="txtappname" class="<%if(useHomeButton)%>homeButton<%}%>txtappname">&nbsp;
<%=apptitle%>
    </span>
</td>


Enter the following code after the code found above:

<td width="290"nowrap style="vertical-align:top" align="right">
    <span class="txtappname">&nbsp;
        <font color="C0C0C0">User:        </font><%=userFullName%> &nbsp; &nbsp;
        <font color="C0C0C0">Insert Site: </font><%=defSite%>
    </span>
</td>

Here I add the code to set the new variable on the screen, I also show the userFullName variable here in order to show the user his full name.

Here is a picture of the modification:


Next rebuild the maximo.ear and redeploy the Maximo application.
After loggin in to Maximo you should see the username and default insert site in the header. Could be that your browser has cached some headerinformation, always try a hard refresh (CTRL + F5) if nothing shows up.

It should end up looking like this (I changed the name for privacy reasons):


It looks like itis show twice, but that is only on the startscreen. When opening the Workorders application for example you will see the second mention of the name is useful:


GNZ.

Thursday, January 16, 2014

Use UNC path as location for Attached Documents in Maximo 7.5

Goal: 
Use a network location (UNC Path) as Attached Documents location in Maximo 7.5.0.5 on Windows Server 2012. 

Problem:
When configuring a attached documents configuration Maximo needs a drive letter. This drive letter can be linked to a UNC path where the documents should be stored.

However, the mapping is not available when the user is logged off from the server after a reboot for example.


Solution:
Create a Windows Service that will create a drive mapping. This way the drive is available when the server starts.


I did this on a Windows Server 2012 environment with Maximo 7.5.0.5


Step 1. Create a Windows Service that will map the UNC path to a drive letter.

I use the 'Non Sucking Service Manager' tool to create a service. Great name :) 

The service will execute a batch file which in return will first delete the network mapping and the create it again.

You can download the tool here: http://www.nssm.cc

Next i create a bat file in which the mapping is deleted and then created again.

net use e: /DELETE /YES


net use e: \\FILESERVER01\Maximo\Test /user:domainname.com\USERACCOUNT PASSWORD

Fill in the appropriate values so it matches your environment. When I navigate to the FILESERVER01\Maximo\Test make sure there is a folder DOCLINKS7, you will see it in Step 2.


I save the bat file as autoexnt.bat, you could name it anyway you like.

Next, open a dosbox as an Administrator and navigate to the location of the nssm tool.

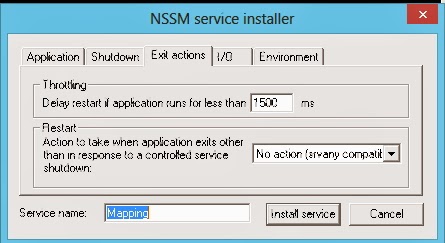
Then type:  nssm install Mapping
Note that 'Mapping'  is the name of the Service you can name it anyway you like. A dialog will open.


Now choose the created batch file in the Path option. You can also change the name of the service again here.


Now go to the Exit actions tab in the nssm tool and at the Restart dropdownbox, choose 'No action (srvany compatible)' This will prevent the service from keep trying to delete and make the mapping it it fails.


Click on the 'Install service' button to create the Service.


Open the Services.msc and check the Service. Make sure it is set to the 'Automatic' Startup Type


Next we open the IBM HTTP Server 7.0 Service ans set the Startup type to 'Automatic (Delayed Start)'

This is needed to make sure the Mapping service has created the mapping before the webserver that serves the Maximo documents is starting up. 


Now we have a mapping ready for us whenever the server is running and after a reboot the mapping will be created even if no user logs on to the server.


Step 2. Webserver configuration.

Now we need to configure Maximo to use the Mapping, this is standard Doclnks configuration, but i will post it here anyway, just to show you it works :)

I run a Notepad ++ as Administrator and navigate to D:\ibm\HTTPServer\conf. I open the httpd.conf file (make sure you create a backup first)


On line 221 modify the DocumentRoot like so:

#
# DocumentRoot: The directory out of which you will serve your
# documents. By default, all requests are taken from this directory, but
# symbolic links and aliases may be used to point to other locations.
#
#DocumentRoot "D:/IBM/HTTPServer/htdocs"
DocumentRoot "E:\DOCLINKS7"


on line 249 modify the Directory like so:
#
# This should be changed to whatever you set DocumentRoot to.
#
#<Directory "D:/IBM/HTTPServer/htdocs">
<Directory "E:\DOCLINKS7">

Here is an overview of the file:


Save the httpd.conf and close the Notepad ++

 
Step 3. Configure Maximo.

Like in step 2 this is also standard Maximo Doclinks configuration.

I modify the following properties in the System Properties:

mxe.doclink.doctypes.defpath  ->  E:\DOCLINKS7
mxe.doclink.doctypes.topLevelPaths  ->  E:\DOCLINKS7


and the following property:

mxe.doclink.path01  ->  E<PATH>\DOCLINKS7 = http://MaximoServerName/

where the MaximoServerName if the name of your Maximo server.


You can also set the mxe.doclink.path01 in the maximo.properties file, this can be nice when rolling back databases.
That would look like this:


And finally you set the Folders in each application that uses Attached Documents in Maximo.


Step 4. Completing.

Now rebuild and redeploy Maximo.

When finished, reboot the server completely to test everything.

When logged on on the server you will see the drive as a 'Disconnected Network Drive' 
This is normal, and when you click on it, it should show the content of the folder.


So there you have it, a UNC path as a Doclinks location.

GNZ.